Installing EasyPhpAlbum
2 steps to get your own album online
Installing EasyPhpAlbum 2-step method (standard layout – one album):
- Create an empty and write-enabled directory on your webserver
- Upload the EasyPhpAlbum index.php script and your photo’s to this directory
or … the 4-step method (your personalised layout & multiple albums):
- Open Notepad and edit the EasyPhpAlbum index.php script to enable admin access and set a login and password
- Create an empty and write-enabled directory on your webserver
- Upload the modified EasyPhpAlbum index.php script to this directory
- Open the index.php page in your webbrowser, press the ‘Tab’ key to get to the administrator login page
Updating EasyPhpAlbum:
Updating EasyPhpAlbum is just as easy as creating your albums, you only have to replace a single file!
From EasyPhpAlbum 1.3.7 the index.php files inside your albums are all linking back to your main gallery index.php file. By replacing the main index.php file you also update all your albums at the same time.
EasyPhpAlbum Directory Structure:
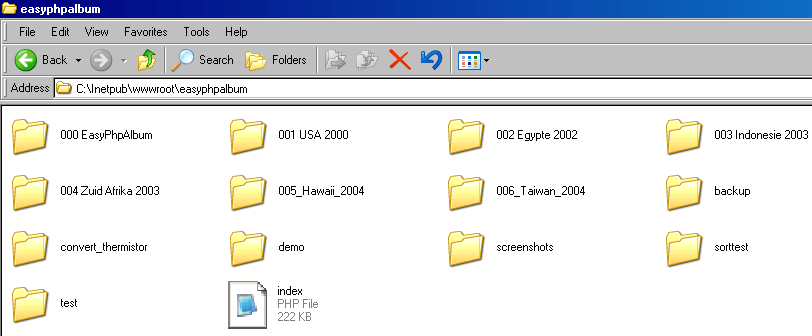
Here are some screenshots that explain the directory structure of EasyPhpAlbum in more detail:

This could be your website directory structure, it has some directories, html documents, perhaps images etc. The directory ‘easyphpalbum’ is going to be the directory in which your photoalbums are going to be located. You have to make sure this directory is empty to begin with and it has full write/read access, which you need to set manually on the command line ‘chmod 0755 easyphpalbum’ or you have to set it with your FTP programme (right click). Of course you can give the directory any name you would like. Your main webpage, the index.html, will probably feature a link to your photoalbum which would be something like href=’easyphpalbum/index.php’.

This is the content of your easyphpalbum directory. The directories represent the photoalbums that are available, the index.php file is the EasyPhpAlbum index.php script. The EasyPhpAlbum index.php file is the only file you need to create and publish your online photoalbums. You have two options:
- You only need one album and you are happy with the standard layout EasyPhpAlbum comes with, then you upload the index.php file and your photo’s into the same directory and you are done!
- You would like to create your own layout and/or create multiple albums. In that case you have to enable administrator access to your photoalbum.
Enabling administrator access: Edit the index.php file in Notepad or another text editor and set admin access to true and provide a proper password and login. Save the changes you made and upload the index.php file with an FTP programme to the photoalbum directory. Open the EasyPhpAlbum index.php page in your browser and press the ‘Tab’ key on your keyboard. This will take you to the administrator login page. Now you are able to create multiple albums and configure over 150 layout settings per album.
Updating EasyPhpAlbum: If you would like to update EasyPhpAlbum you replace this index.php file with the newer version and you are done!

This image shows the content of a photoalbum called ‘screenshots’. The directories you see and the index.php file are created by EasyPhpAlbum.
- backup: This directory contains all the photos you placed in backup. Photos in the backup directory are ‘originals’ or not ready for publication
- hitcounters: This directory contains all the hitcounter files. Each photo has its own file with the score and IP-addresses of the visitors
- ratings: Similar to the hitcounters directory except that it contains files for the rating feature
- textfiles: This directory contains the textfile with a description or comments belonging to the photo
- thumbnails: This is actually the most important directory, it is going to contain all the thumbnail images from the photos
- index.php: This is the index.php for this album, it links back to the main index.php file one level higher
- Screenshot01 and 02: These are the photos in this album. You can add hundreds of photo’s in an album. There is no limit.